Building the Perfect Valheim Roof: Tips and Tricks for Viking Architecture
Understanding the Importance of a Valheim Roof
In the world of Valheim, a well-constructed roof is more than just a decorative element; it is a necessity for survival. It protects your home from harsh weather conditions, such as rain, and ensures that your indoor fires remain lit, keeping your Viking warm and safe. Without a proper roof, your hearths can be doused by rain, leaving you vulnerable to the elements.
Choosing the Right Materials for Your Valheim Roof
When constructing a roof in Valheim, the choice of materials is crucial:
Wood: The most accessible material, especially early in the game, wood is a reliable option for beginners. It’s ideal for building your first mead halls and shelters.
Stone: Once you’ve unlocked the stonecutter, stone can be used to create a more durable structure. While primarily used for walls, combining stone with wood elements can enhance the robustness of your roof.
Iron: For added stability, especially in larger structures, iron beams can be used to reinforce the support. Although iron is not used directly for roof tiles, it plays a vital role in ensuring the structural integrity of your roof.
Crafting Aesthetically Pleasing Valheim Roofs
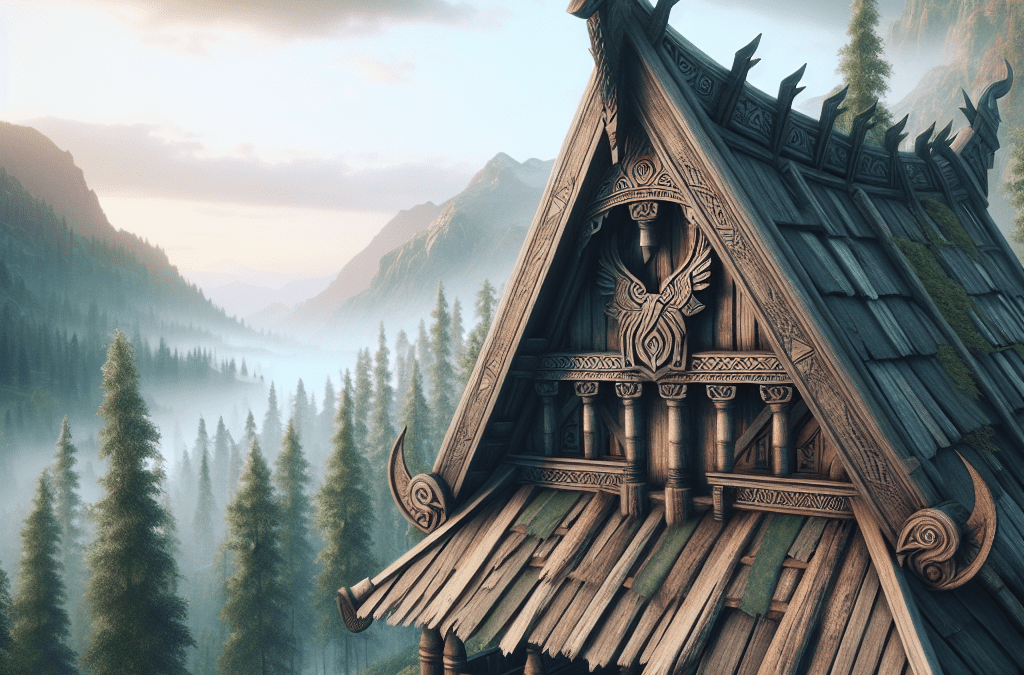
A visually appealing roof can elevate your simple house into a majestic Viking fortress. Here are some tips to enhance the aesthetics:
Variated Slopes and Heights: Mixing different roof slopes, such as 26-degree and 45-degree angles, adds depth and character to your buildings. Combining varied heights allows for creative interior layouts and a more dynamic appearance.
Decorative Elements: Use dragon motifs, additional beams, and other decorative elements to accentuate your roof design. These touches can make your home stand out and add a personal touch to your Viking architecture.
Color and Wood Type: Experimenting with different wood types and treatments can add texture and visual interest to your Valheim roof. For instance, using darkwood for accents can provide a rich contrast against lighter wood environments.
Tackling Common Roofing Challenges in Valheim
Building the perfect Valheim roof comes with its challenges:
Structural Integrity: Ensure your roof has the necessary support by using beams and poles to distribute weight evenly. For steep or pointy roofs, using iron beams on the corners and potentially staggering them in the middle can provide additional support.
Weather Protection: Ensure that your roof tiles overlap correctly to prevent leaks. A small gap can lead to significant issues, so careful placement is essential.
Mob Protection: While roofs generally provide good coverage, be mindful of potential gaps that flying creatures could exploit. Adding extra layers of roofing or ensuring that the roof design does not leave vulnerable spots can help thwart unexpected attacks.
Incorporating Functionality into Your Valheim Roof
While aesthetics are important, functionality should never be compromised:
Smoke Ventilation: Ensure there is enough ventilation for smoke to escape from your fires. An open chimney or strategically placed holes allow smoke to exit without letting rainwater in. This is crucial for maintaining a safe and warm interior environment.
Lighting and Atmosphere: Roofs can be designed to create ambient lighting effects. Adding skylights or strategically placed torches can create a warm and inviting atmosphere within your home.
Additional Tips for Building a Perfect Valheim Roof
-
Frame Your Structure First: Before adding walls and roofs, use core wood logs to frame everything out. This helps in determining the direction of your roof and ensures a solid foundation.
-
Use Gable End Sections: Utilize gable end sections to guide the direction of your roof. This helps in maintaining a consistent and aesthetically pleasing design.
-
Avoid the ‘Christmas Tree’ Look: When building a roof, avoid the ‘Christmas tree’ look by breaking up the pattern of the roof beams. Use one-meter beams and 45-degree roof beams alternately to create a more consistent and visually appealing roof.
- Utilize Glitches to Your Advantage: In some cases, using specific beam lengths can prevent certain parts of your roof from rotting. For example, using two-meter by two-meter beams instead of one-meter beams can prevent rotting under the roof.
By combining these tips and strategies, you can build a Valheim roof that is not only functional and protective but also a testament to your creativity and mastery of Viking architecture.
Q: How do I build a roof in Valheim?
A: To build a roof in Valheim, you need to have a hammer equipped and access the building menu. Select roof pieces, such as 26° or 45° thatch roof tiles, and place them onto walls or support beams of your structures.
Q: Why won’t my roof snap into place in Valheim?
A: Roof pieces might not snap into place if there isn’t proper support. Ensure you have walls or beams beneath them, and check the stability using the color coding that appears when hovering over building pieces.
Q: What angle should I use for my roof in Valheim?
A: The angle of the roof (26° or 45°) can depend on your aesthetic preference and the local weather conditions; steeper roofs are often better for areas with heavy rain or snow to allow moisture to run off effectively.
Q: How do I prevent rain from damaging my structures in Valheim?
A: Ensure your building has a fully covered roof to protect it from rain. Make sure there are no gaps, and remember to use chimney designs to keep fires burning safely indoors without exposure to rain.
Q: Can I build flat roofs in Valheim?
A: While you can technically build flat roofs using floor tiles, these surfaces won’t protect structures from rain damage, as there’s no proper drainage. It’s advised to use angled roof tiles to prevent this issue.
Q: What materials do I need to craft roof pieces in Valheim?
A: Basic roof pieces like thatch roofs require wood, but as you progress, you might need core wood or other materials for stronger and more decorative options.
Q: Can I change the roof design after building it in Valheim?
A: Yes, you can demolish existing roof tiles by using the middle mouse button with the hammer equipped and then place new pieces as desired.